


JetBackup 5 User Panel: Your Guide to Restoring Backups in cPanel
At Web Design Hosting, we understand that sometimes things go wrong, or you might need to revert your website to an earlier state. That's why we provide JetBackup 5, a powerful and easy-to-use tool directly within your cPanel account, to help you restore your website, databases, emails, and more from our automatically generated backups.
This guide will walk you through the process step-by-step.
Important Notes Before You Start:
- Backup Frequency: We take daily backups and a weekly backup of your entire account.
- Backup Retention: Backups are retained for 15 days.
- Restore Overwrites Data: Restoring a backup will overwrite the current data on your account for the selected items. Always be sure you want to revert to the chosen backup date. If you're unsure, you can download the backup first to inspect its contents.
- Disk Space: Ensure you have enough disk space in your hosting account for the restoration process.
- Troubleshooting: If you encounter any issues, please refer to the "Troubleshooting & Common Issues" section at the end of this guide or contact our support team.
Section 1: Accessing JetBackup 5 in cPanel
-
Log in to your cPanel account.
- You can typically do this by visiting https://cpanel.yourdomain.com (replace yourdomain.com with your actual domain) or through your client area.
- Enter your cPanel username and password.
- Once logged into cPanel, scroll down to the "Files" section.
- Click on the "JetBackup 5" icon.
Locate and Click JetBackup 5.
-
Accept the User Agreement (First Time Users).
- If this is your first time accessing JetBackup 5, you might be greeted with a User and Privacy Policy Agreement. Review the terms, check the "I Agree" checkbox for each section, and click "Continue to Panel" to proceed.
Section 2: Understanding the JetBackup 5 Dashboard
Once you open JetBackup 5, you'll see various options for different backup types. The availability of these options depends on the permissions granted by Web Design Hosting.
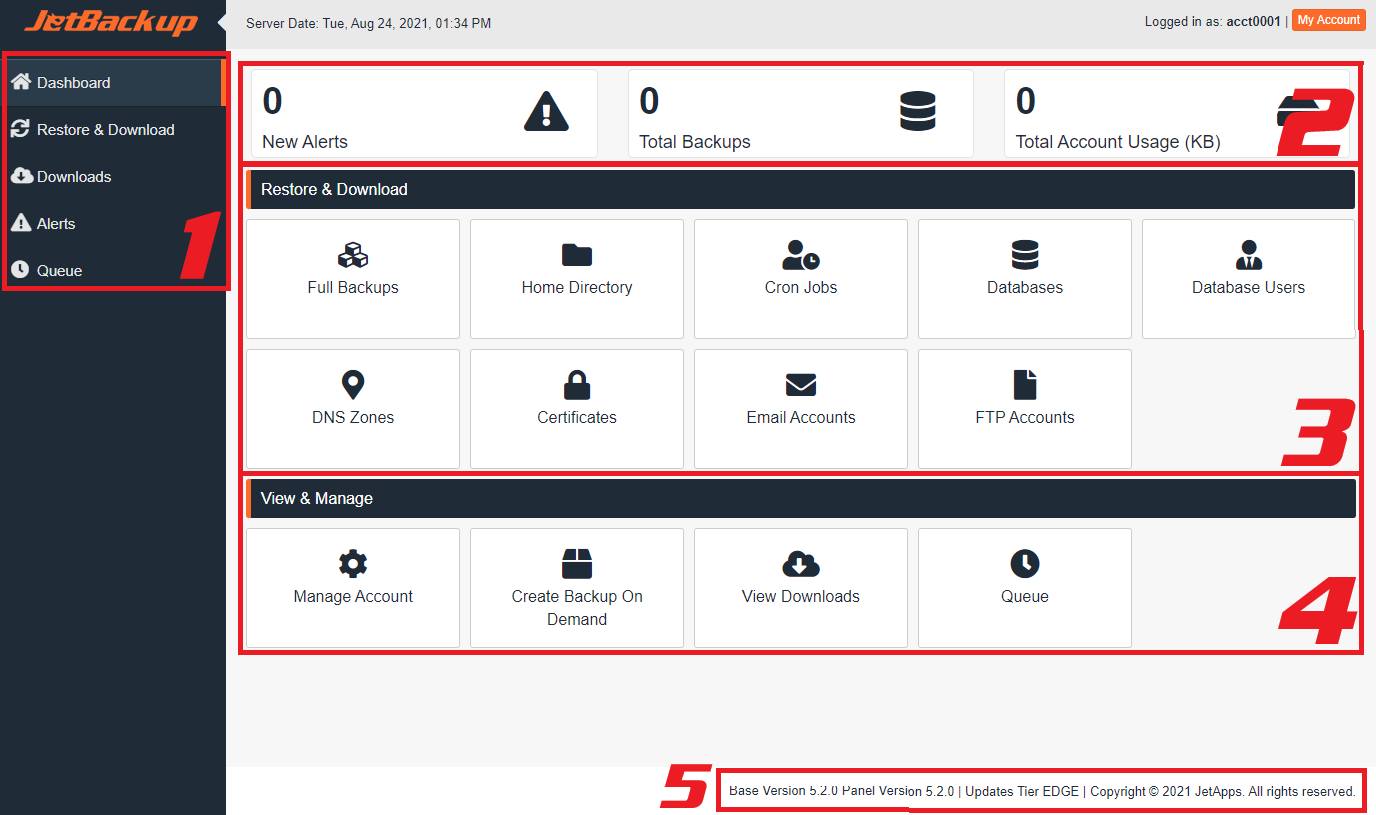
Common backup types you'll find include:
- Full Account Backups: Restores your entire cPanel account, including all files, databases, email accounts, cron jobs, DNS zones, and SSL certificates.
- File Backups: Allows you to restore individual files or folders within your home directory.
- Database Backups: Restores your MySQL/MariaDB databases.
- Email Backups: Restores your email accounts and their contents (excluding junk folder).
- Cron Job Backups: Restores your scheduled cron jobs.
- DNS Zone Backups: Restores your DNS zone records.
- SSL Certificate Backups: Restores previously issued SSL certificates.
- Queue: Shows the progress and status of your active and completed restore/download requests.
- Downloads: Lists completed backup downloads that you can access.
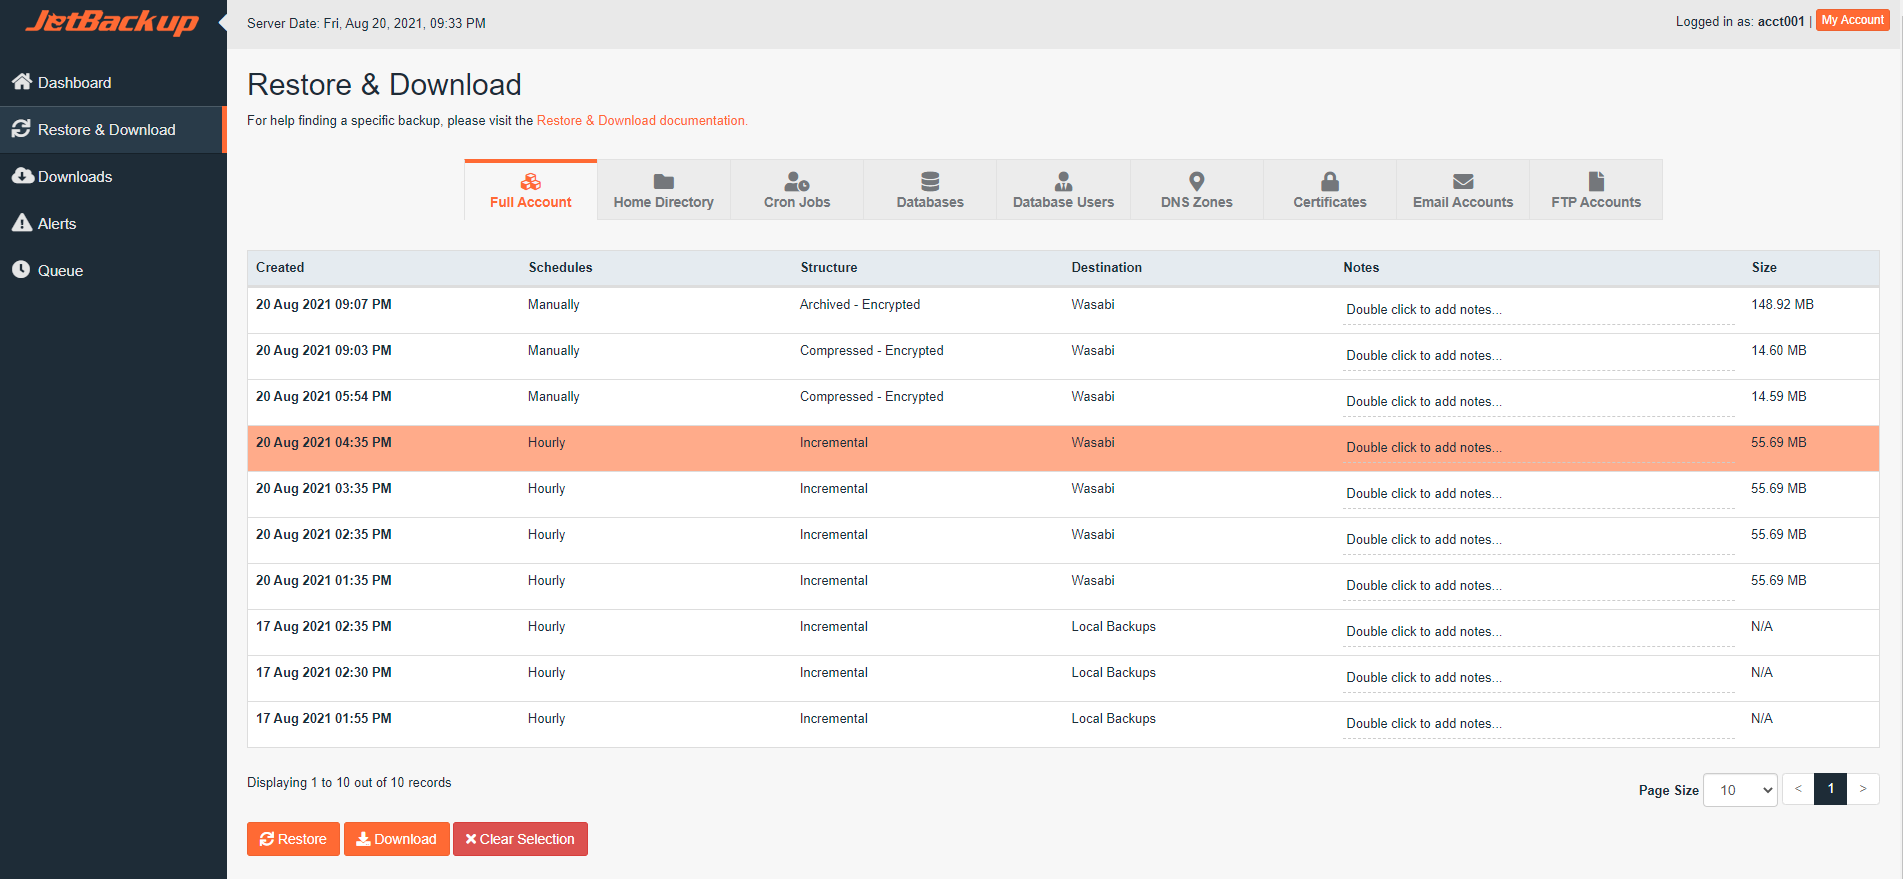
Section 3: Restoring Your Website (Full Account Restore)
This is the most comprehensive restore option and is useful if your entire website is corrupted, missing, or you need to revert everything to a previous state.
-
From the JetBackup 5 dashboard, click on "Full Account Backups".
-
Select the Desired Backup Date.
- You'll see a list of available full account backups, typically organized by date and time.
- Carefully review the list and click on the backup entry with the date and time you wish to restore from.
- After selecting the backup date, a "Restore" button will become active at the bottom of the list. Click on it.
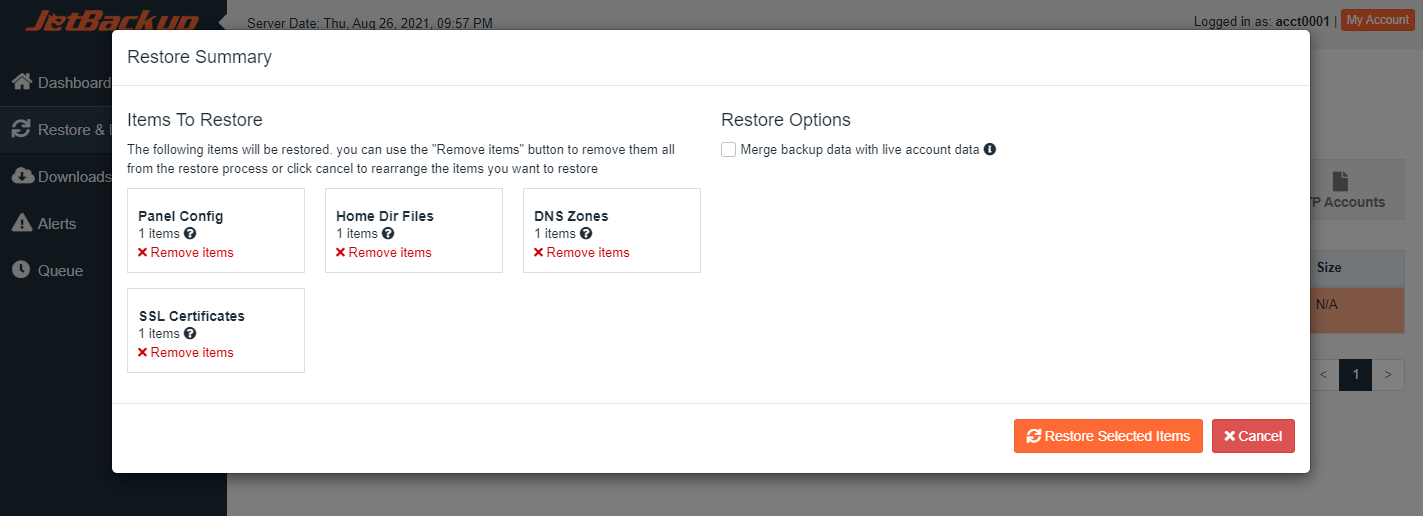
Initiate the Restore Process.
-
Confirm the Restore.
- A pop-up window will appear, summarizing the items that will be restored.
- Click "Restore Selected Items" to confirm and add the request to the restore queue.
-
Monitor the Restore Process.
- After confirming, you'll see a message indicating the restore request has been queued successfully.
- You'll automatically be redirected to the "Queue" section, or you can navigate there manually from the JetBackup 5 main menu.
- Here, you can monitor the progress of your restoration. The status will change from "Processing" to "Completed" (or "Failed" if there was an issue).
- Do not close your browser tab or window until the process shows as "Completed". Depending on the size of your account, this can take anywhere from a few minutes to several hours.
-
Verify Restoration.
- Once the status shows "Completed", you can visit your website to confirm that everything has been restored as expected.
- Tip: Clear your browser cache or use an incognito/private Browse window to ensure you're seeing the latest version of your website.
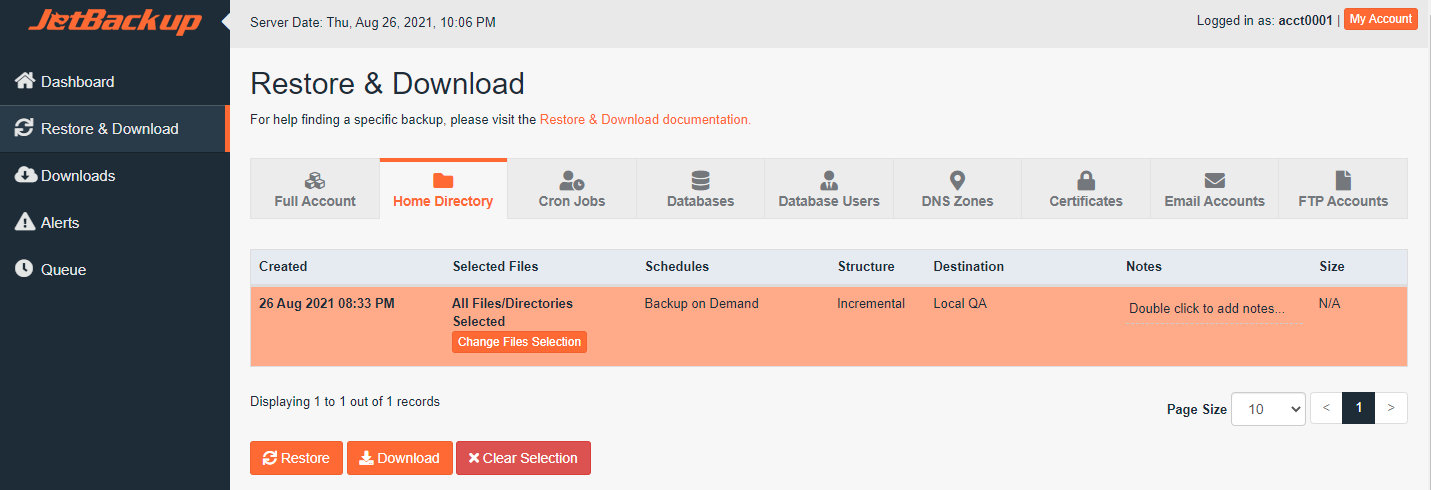
Section 4: Restoring Specific Files or Folders
If you only need to restore a few specific files or a single directory (e.g., your public_html folder where your website files are located), this option is more efficient than a full account restore.
-
From the JetBackup 5 dashboard, click on "File Backups".
-
Select the Desired Backup Date.
- Choose the backup date that contains the files you wish to restore.
-
Change File Selection.
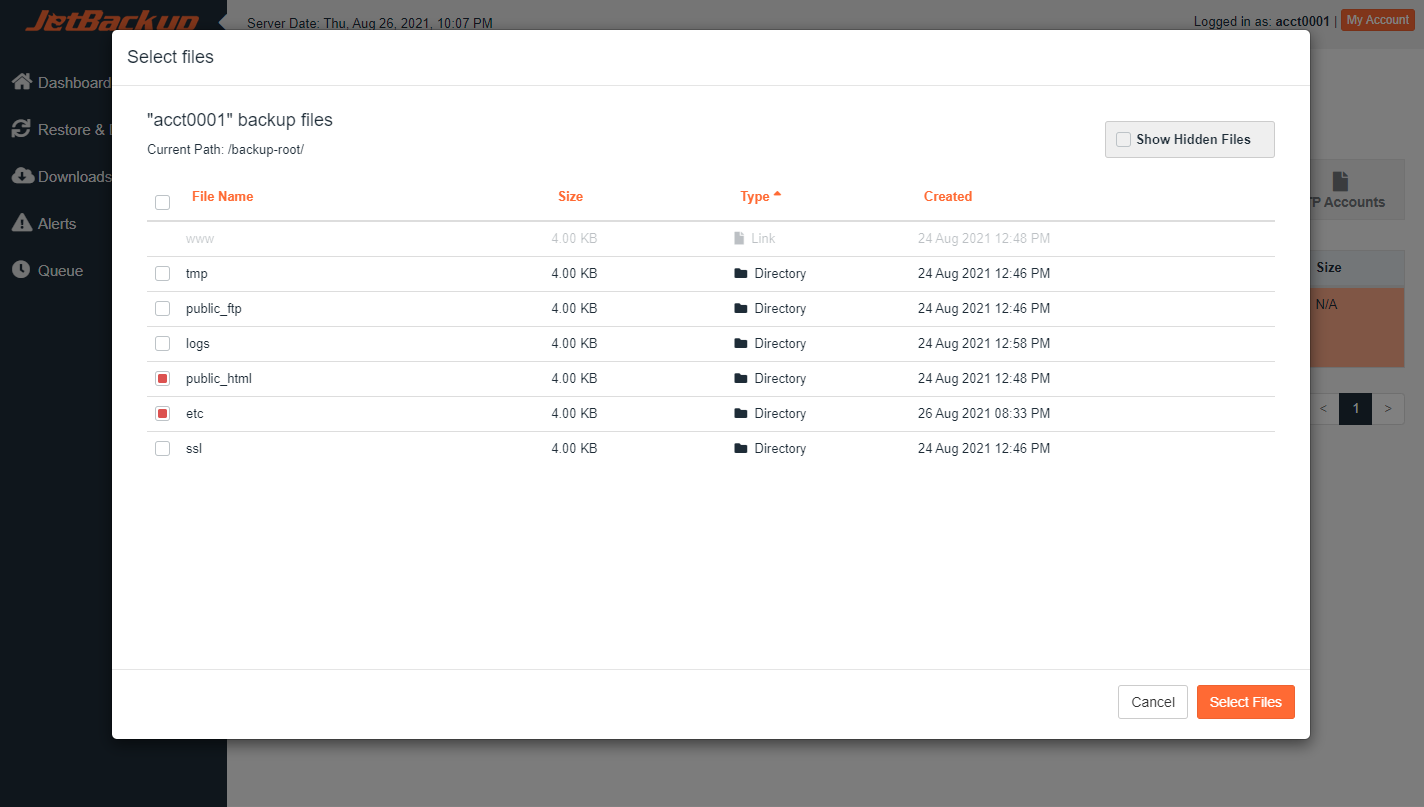
- After selecting the backup date, click the "Change File Selection" button. This will open a file browser.
-
Navigate and Select Files/Folders.
- Browse through the directories to locate the specific files or folders you want to restore.
- Check the box next to the file(s) or folder(s) you wish to restore.
- Click "Select Files" at the bottom right to confirm your selection.
-
Initiate and Confirm the Restore.
- You'll be returned to the File Backups screen, with your selected files/folders listed.
- Click the "Restore Selected Files" button.
- Confirm the action in the pop-up by clicking "Restore Selected Items".
-
Monitor and Verify.
- Monitor the restore process in the "Queue" section, as described in Section 3, Step 5.
- Once completed, verify that the restored files are present and functional on your website.
Section 5: Restoring Databases
This is crucial if your website's database (e.g., for WordPress, Joomla, or other CMS) has become corrupted or lost.
-
From the JetBackup 5 dashboard, click on "Database Backups".
-
Select the Database and Backup Date.
- You'll see a list of your databases. Locate the database you need to restore.
- For that database, select the desired backup date from the dropdown menu.
-
Initiate and Confirm the Restore.
- Click the "Restore Database" button next to the selected database and date.
- Confirm the action in the pop-up by clicking "Restore Selected Items".
-
Monitor and Verify.
- Monitor the restore process in the "Queue" section.
- Once completed, check your website to ensure the database-driven content is working correctly.
- Important: If you changed your database name or credentials after the backup was taken, you'll need to update your website's configuration file (e.g., wp-config.php for WordPress) with the correct, restored database details.
Section 6: Restoring Email Accounts
If you're experiencing issues with missing emails or deleted email accounts, you can restore them here.
-
From the JetBackup 5 dashboard, click on "Email Backups".
-
Select the Email Account and Backup Date.
- Find the email account you wish to restore.
- Select the desired backup date from the dropdown menu.
-
Initiate and Confirm the Restore.
- Click the "Restore Email Account" button.
- Confirm the action in the pop-up by clicking "Restore Selected Items".
-
Monitor and Verify.
- Monitor the restore process in the "Queue" section.
- Once completed, log into your webmail or email client to verify that your emails and account settings have been restored.
Section 7: Downloading Backups (Optional)
JetBackup 5 also allows you to download a copy of your backups to your local computer for safekeeping or for manual restoration. The process is very similar to restoring.
- Navigate to the desired backup type (e.g., "Full Account Backups," "File Backups," "Database Backups").
- Select the backup date you wish to download.
- Instead of clicking "Restore," click the "Generate Download" or "Download" button.
- JetBackup will process your request and create a downloadable .tar.gz (similar to a .zip) file.
- Once the download is ready, it will appear in the "Downloads" section of JetBackup 5, where you can click a button to save it to your computer.
- After downloading, you can click "Delete Download" to remove the temporary file from your hosting account's storage.
Section 8: Troubleshooting & Common Issues
- Backup Not Available?
- Double-check that you are selecting a date within our backup retention period.
- Contact Web Design Hosting support to confirm that JetBackup is enabled for your account and if there are any specific backup limitations.
- Restore Failed?
- Ensure you have sufficient disk space in your hosting account. A lack of space can cause restores to fail.
- Try restoring an earlier backup date. The most recent backup might be corrupted.
- Check the "Queue" for any error messages that might provide more details.
- Contact Web Design Hosting support with any error messages you see.
- Website Not Working After Restore?
- Clear Browser Cache: Your browser might be showing a cached version of your website. Clear your browser's cache or try viewing your site in an incognito/private Browse window.
- File Permissions: Occasionally, file permissions might be incorrect after a restore. Files should generally be 644 and directories 755. This usually resolves itself, but if you're comfortable, you can check them via cPanel's File Manager.
- Database Credentials: If you restored a database and your website is still not connecting, verify that the database credentials in your website's configuration file (e.g., wp-config.php for WordPress) match the restored database's credentials.
- DNS Propagation: If you've just updated DNS records or performed a full site migration, it can take up to 24-48 hours for DNS changes to fully propagate across the internet.
- "Internal Server Error" (500) during/after restore: This can be a temporary issue while cPanel is processing the restore and rebuilding your account. Wait a few minutes and then refresh the JetBackup 5 "Queue" page. If the error persists, contact support.
